Last updated on December 8th, 2023
Verdict
Capture One Pro is a versatile photo management and editing software. It offers easy-to-use features for beginners to advanced tools like tethering and sessions for professional photographers. Furthermore, Capture One is the best alternative to Lightroom without needing to pay for a monthly subscription. Continuing reading this Capture One review for more details.

Introduction
You’re probably wondering if you should use Capture One or not for your photography workflow.
It’s a big decision because the wrong photography software will slow down your progress as a professional photographer or enthusiast.
I tested the software and I’ll provide you with the relevant information in this Capture One Review.
I’ve been using photography software for 8+ years, so I believe I have a good idea of what to look for in Capture One and its overall photography workflow.
Let’s get started.
What is Capture One?
Capture One Pro is a comprehensive image management and editing software developed by Phase One.
You may have not heard of Phase One before as their brand is not as popular as Adobe, but they’re still a big brand based in Copenhagen, Denmark.
Their primary business is manufacturing cameras. But again, their brand is not as popular as Canon, Nikon, or Sony. That’s because they sell some of the most high-end, expensive cameras in the world.
The Phase Once XT camera system starts at $56, 990. That’s well over most photographers’ budget including mine.
Fortunately, we don’t need a Phase One camera to take advantage of Capture One Pro.
There is also a free version of Capture One called Capture One Express, which only supports Fujifilm, Nikon, and Sony cameras with limited features.
As a professional or novice photographer, Capture One Express won’t serve your purpose, but it is a good way to remain within budget.
If you want to read about the differences, below is a Capture One Express vs Pro summary which lists the important missing features in Capture One Express.
In this article, I’ll be reviewing Capture One Pro 21 which was released on December 8, 2020.
The prior major versions were Capture One 12 and 20. The version numbers jumped from 12 to 20 for marketing purposes and to align it with the year 2020. There were no actual versions between 13 and 19.
Important Note: Capture One 21 is still being worked on to fully support Mac’s M1 chip.
Capture One Pros and Cons
Pros
- No subscription required with a perpetual license.
- Discounted price for Sony and Fujifilm photographers.
- Offers 2 comprehensive methods of image management.
- Great RAW rendering.
- Supports layers.
- Advanced color grading.
Cons
- Interface will take some time getting used to.
- Advanced retouching requires other software.
- No panorama stitching.
- No HDR merging (requires plugin).
- Layer don’t have blend modes.
- No book or album module to help with print layouts.
Capture One Review Summary
Capture One has several features that is standard across photography applications that I won’t mention. Rather, I’ll provide a summary of the important ones.
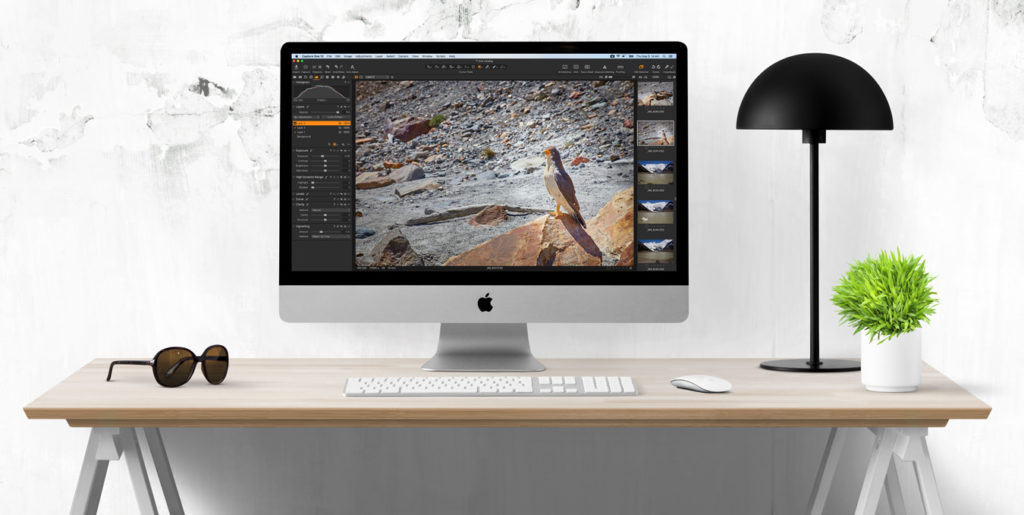
User Interface
I’m not going to sugarcoat this, I personally found it challenging to get accustomed to Capture One’s interface.
Yes, I was able to load images into Capture One, edit them, and export them without difficulty. But getting to a proficient level will take some time and good memory. The software has many tools and features to remember exactly where they all are. I needed the help of a few free tutorials to figure things out.
But once you figure out where the important features are, then everything will make sense. And you’ll be on your way.
The Capture One team frequently hosts live webinar tutorials to help users with their progress.
If you don’t like Capture One’s interface, then it’s not a problem. You can customize it. They also provide a workspace for wedding shoots or tethered capture.
I usually use the default interface setup since I’m used to it now. But I sometimes customize the interface if I’m recording a tutorial or testing a group of tools. Then I reset the workspace back to default.
RAW File Handling
Capture One is a RAW editor. That means it can render a RAW file into a viewable digital image for editing.
As you probably already know, RAW files have more data to play around with for better image enhancements. The software supports RAW formats from Canon’s CR2 files to Sony’s ARW files. And it certainly supports Phase One’s IIQ RAW file.
In fact, Capture One Pro supports over 500 camera models and their corresponding RAW files.
On the other hand, Capture One does not support Hasselblad cameras, one of Phase One’s main competitors. Hasselblad does provide a free RAW image editor for their cameras called Phocus. However, the workflow of Phocus doesn’t compete with Capture One.
Capture One can also edit JPG, TIFF, DNG, PNG, and PSD files.
Image Management
One of the most important aspects of photography is organizing.
When you shoot as a hobbyist or professional photographer, you will easily have over 10,000 images. Many of these photos you will need to keep permanently.
In most scenarios, the only organizing you can do while shooting is keep your SD cards secured and organized. Maybe some cameras will allow you to move images within SD card folders.
But when you return to your workstation at home or in the office, the comprehensive management of your assets starts and you’ll need a photo organizing software.
Managing photos effectively and being able to locate an image or a group of images within a few seconds is crucial to not waste time.
Capture One helps with asset management starting with the import process.
When you’re importing images in Capture One, you’ll be provided with several options to help your workflow when you move on to the editing or exporting steps.
During the import step, Capture One will allow you to:
- Choose your images or folders containing your images. In most cases, it will be from a memory card.
- Choose the location of where you want to import your images. You can allow the source files to remain in their current location if they’re already on an external or internal hard drive.
- Choose a secondary location to back up your photos.
- Rename the image files with a custom or template scheme.
- Apply copyright and description metadata.
- Apply an adjustment style or preset to the images.
Personally, I just import the images and move them to a new folder. I usually forget, but it’s a good idea to add copyright metadata to your images.
Unless you choose otherwise, Capture One will assign your image files to a default Catalog.
Capture One Catalogs vs Sessions
A Catalog is a database of your photos and has the COCATALOG file extension in Capture One. It points to the location of your image files which is called a referenced workflow.
The photos can be stored locally on your computer or on an external hard drive. The images in a Catalog can be organized by a hierarchy system of collections, albums, projects, and groups.
A Session is also a database but is project-oriented: it’s a complete project with a file extension of COSESSIONDB in Capture One.
You create a new Session (if you want) for each client or project. Each Session creates a new database with a modular system of folders: capture, selects, output, and trash.
You can move the images between these folders within Capture One, from the Mac Finder or Windows Explorer.
The advantage of Sessions is it updates the library dynamically. This means the sessions folders will always be up to date with the image file handling, something Catalogs can’t do. It’s a bit like Adobe Bridge.
Sessions are great for tethered shooting because on a live shoot workflow, you don’t have to keep updating the location of the image file locations while they’re being moved between folders.
When would you use a Catalog or Session?
I do travel photography. So, one Catalog database is fine with me and I can organize my travel photos via country albums or folders.
For photographers with clients, such as portrait photographers, Sessions are probably the way to go. The initial images you photograph go in the capture folder, the images you select or want to keep are moved into the select folder, the rejected images go in the trash folder, and the client-provided final images will go into the output.
It’s a great way to shoot tethered and provides some final images to the client on the spot. Think about displaying wedding photos on the same day, at the reception, on a large projector. It happens all the time.
This is just an example of how Capture One Catalogs and Sessions work. Some photographers may choose to create multiple Catalogs for each project or one Session for multiple projects.
If you don’t understand the difference between Catalogs vs Sessions — don’t worry — it’ll come with practice.
Rating and Tagging Photos
To further organize your images, Capture One allows photographers to apply a 5-star Rating or Color Tag to an image.
There are 7 colors available from red to purple.
Use the Rating and Tagging features to sort or find images at a later time.
Image Editing
Capture One has a variety of tools for image editing and serves most purposes.
I’m not going to list each tool since they are basics for image editors. However, I’ll provide a review of some useful tools.
Focus Mask
The Focus Mask view indicates which parts of an image are in focus by displaying a green mask over the area.
This allows you to determine which parts need improvement in terms of sharpening or if you should move on to the next image.
I find the Focus Mask works best for images with a clear subject like portrait or food photography. It doesn’t work well for landscape images.
And it only works on RAW files.
Lens Correction
Capture One does a great job at rendering and displaying RAW images.
Photographs that are captured with lenses that are known for significant distortion or vignetting are also rendered well in Capture One.
In addition, if there is still significant lens distortion or light falloff, you can apply a Lens Profile to improve the image quality.
Annotations
Annotations allow you to mark or write on your photos with your mouse or a stylus pen.
This comes in handy while you’re reviewing your images and want to jot down reminders for what needs to be corrected.
It’s more useful when you’re collaborating with a studio. You mark what needs to be edited and pass it on to someone else on your team. For example, from photographer to retouch editor.
Capture One allows users to share images along with the Annotations through an EIP file.
Levels and Curves
The Levels tool allows Capture One users to set new black and white points to an image. This helps photographers expand the tonal range proportionally in flat images.
The tool can also be used to adjust the tonal range or color balance of an image using the individual RBG channel levels.
The Curves tool also allows users to adjust the tonal range but takes it a step further by allowing users to set new tonal values at multiple points along the tonal range.
Like Levels, Curves can also adjust the RBG channel plus the Luma channel. The Luma curve is beneficial if you want to adjust the contrast or brightness without affecting the saturation.
HDR
Capture One has a dedicated highlight and shadow recovery adjustment nested in the HDR tool. It’s great for correcting the exposure in the highlights, shadows, whites, and blacks.
But don’t be mistaken by the name, Capture One can’t merge bracketed photos to create an HDR image. However, you can HDR merge bracketed photos with the Photomatix plugin. But the best HDR software is Aurora HDR (read review).
Clarity
The Clarity tool has two adjustment sliders. One for Clarity and the other for Structure.
The Structure slider adds detail and depth to the image without adjusting the contrast. This tool makes your image look lively. It’s similar to Aurora HDR’s structure tool.
Layers
The ability to create images or adjustment layers is a powerful technique for advanced photo editing.
Capture One allows you to create Layers and see which adjustments are optimal by hiding/showing the different Layers.
The software supports up to 16 Layers.
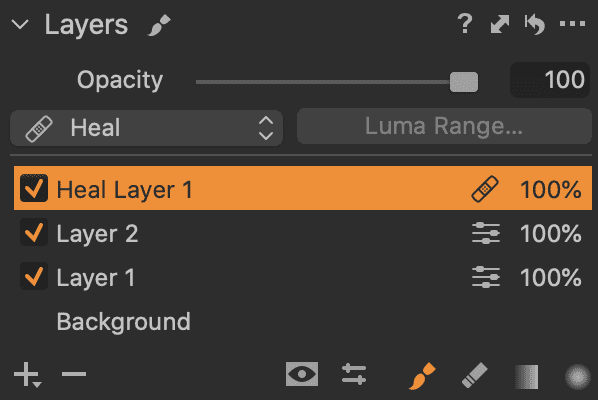
Retouching
The Spot Removal and Clone tools are good for exactly that, removing small debris or dust spots from an image.
You need to create a layer if you want to choose a source spot. And you can only create one source spot unless you create multiple layers.
Don’t expect to do advanced retouching.
For such a great software with plenty of useful tools, Capture One’s retouching is slacking.
Maybe it’s not as important if you’re photographing in a controlled environment such as a fashion shoot.
But as a travel photographer, there are often distracting objects in my photos that require removal. Have you ever been to Chichén Itzá? There are going to be plenty of tourists in your images.
Local Adjustments and Masking
There are 3 masking options: Brush, Linear Gradient, and Radial Gradient. Masking is one of the better ways to improve selective adjustments.
Combine the Masking tools with Layers to take a photo from flat to wow.
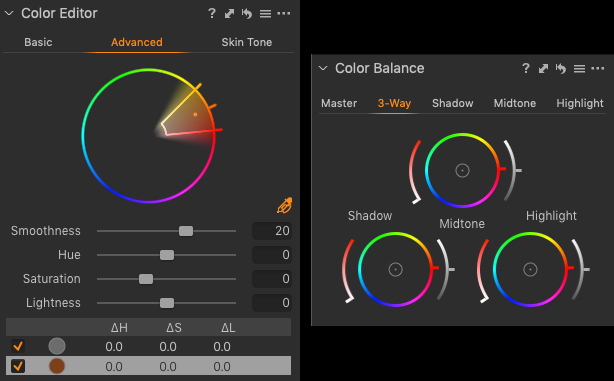
Color Grading
Shifting colors in Capture One is easy with the Color Balance and Color Editor tools.
Color Balance allows you to adjust the hue, saturation, and lightness (HSL) of the shadows, highlights, and midtones.
Color Editor provides advanced color grading without impacting other colors. It also comes with a Skin Tone adjustment option to accurately target people.
Black and White
Capture One’s black and white tool allows you to convert your image to monochrome quickly.
The tool also allows you to create a split tone image by adjusting the hue/saturation of the highlights and shadows.
Air Brush and Pen Pressure
If you decide to use a Wacom tablet and pen, then you can use the Air Brush and Pen Pressure to make additive local adjustments.
Styles and Presets
Save time by applying image adjustments using Styles or Presets.
Styles are a saved combination of multiple adjustment tools.
Presets are only one saved tool setting.
Download my free Capture One Styles.
Soft Proofing
The challenging part of digital photography is what you see of an image on a digital display will not always print the same. This of course can be helped by calibrating your monitor.
But then you’ll run into different printer models and paper that produce different levels of saturation and brightness in an image.
Remember, the colors and brightness of your display are produced by source light. It’s light generated by your screen.
In contrast, the colors and brightness of a print are generated by ambient light. That’s light coming from other sources and reflecting off your prints.
The cliché of what you see is what you get doesn’t apply to digital photography and prints.
To assist with this problem, photographers use a method called soft proofing.
This method allows you to edit your images according to the ICC Profile and paper used by you or your printing company. It’s not 100% error-proof, but soft proofing allows you to print the highest quality images to your standards.
Capture One seamlessly allows you to change the ICC Profile, or what is also known as the Color Profile, and soft proof your image.
Some printing companies will provide you with the ICC Profile file. Others may want your images sent with the sRGB Color Profile.
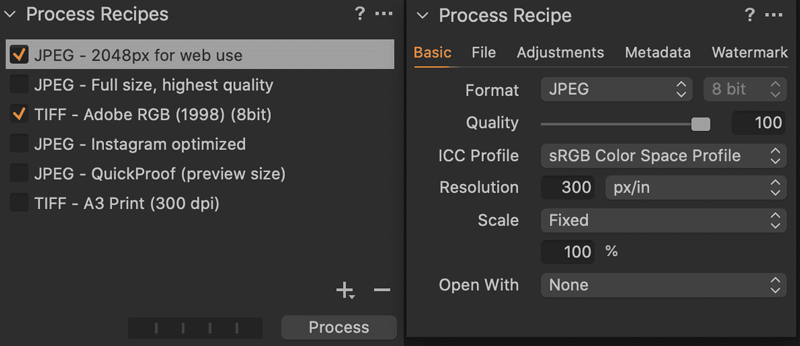
Exporting Images with Process Recipes
The task of exporting images is often an overlooked step in the photography workflow or when analyzing photography software.
In most common scenarios, a user would adjust the export settings for PPI, file type, color profiles, and maximum resolution, then export one or multiple images.
However, the export process is sometimes more complicated than that for client-specific jobs.
Imagine you need to export multiple images with different PPI, file types, resolutions, color profiles, and with and without watermarks. This situation can arise when you’re exporting images for the web, a client, and a printing company. This can be quite a bit of work.
Capture One figured out this problem long ago and provided a solution with their Process Recipe.
The Process Recipe is an automated task to assist with batch exporting multiple image variants.
It saves photographers a considerable amount of time with just a few clicks when getting ready to export.
New Process Recipes can be created and saved as a template for future use.
Performance and System Requirements
I used a near spec’d out iMac to test Capture One Pro 21. There were no performance issues I encountered when editing images.
I’ve also tested Capture One on a 13” MacBook Pro without a dedicated GPU. Again, there were no performance issues I encountered.
macOS System Requirements
- macOS 10.13, macOS 10.14, macOS 10.15
- Intel CPU with 2 cores
- 10 GB free disk space
- 8 GB of RAM
As mentioned earlier, Capture One is still being worked on to support Mac’s new M1 chip.
Windows System Requirements
- Windows 7® SP1 64-bit, Windows 8.1® 64-bit, or Windows 10® 64-bit
- Intel or AMD CPU with 2 cores
- 10 GB free disk space
- 8 GB of RAM
Recommended System Requirements
If working with high-resolution images and doing CPU-intensive adjustment, then the following is recommended:
- Intel or AMD CPU with 4+ cores
- 16+ GB of RAM
- Solid State Disk (SSD)
- Dual (matching) Graphics card from NVIDIA or AMD with 4GB+ RAM per card
- Calibrated monitor with at least 1920×1200, 24-bit resolution at 96dpi
Capture One Price?
One main reason photographers look for a Lightroom alternative is the price.
They don’t want to pay for an Adobe Creative Cloud subscription and prefer to buy a perpetual license of Capture One.
Students receive a 65% discount off the Capture One Pro subscription plan.
I do not shoot with Sony or Fujifilm, but from what other photographers have stated, Capture One is better than Lightroom at rendering RAW Sony and Fujifilm files.
In addition, Capture One comes with a free 30-day trial.
For comparison, an Adobe Creative Cloud photography plan costs $10 monthly and includes Lightroom, Photoshop, and their mobile versions.
Capture One Subscription vs Purchase
In all cases, you should buy a perpetual license of Capture One instead of subscribing.
For Capture One Pro, it’ll pay for itself in 15 months ($20 X 15 = $300 ≃ $299)
For Capture One Sony or Fujifilm, it’ll pay for itself in 13 months ($9.99 X 13 = $129.87
≃ $129).
The advantage of having a Capture One subscription plan is that you’ll always have the updated or upgraded version.
Don’t get confused with update and upgrade.
Updates are minor version updates such as version 10.x to 10.y.
Upgrades are major changes such as version 10.x to 11.x.
However, I don’t think the subscription plan warrants paying extra money for a software when you don’t know when future updates or upgrades will be released or beneficial to your workflow. History does show Capture One has been upgraded each year, in quarter 4, for the past 10+ years.
Furthermore, all updates for a perpetual license of Capture One are free. You would only pay if there is a major upgrade release and you need the upgrade.
Conclusion
Capture One Pro is a great software that manages image files efficiently and creates aesthetic photos.
I believe it’s the go-to photography software for Fuji or Sony shooters.
I covered some of the main points in this Capture One review. But I’m going to further test Capture One and see what type of images I can produce and utilize the color grading a bit more with my Canon photos.
But I am disappointed that I can’t convert RAW camera files into DNG during the import process (maybe I missed something) like Lightroom to save disk space.
A big question you may have is if you should go with Lightroom. Read my Capture One vs Lightroom summary to help make your decision. But if you really want to pull away from Adobe, then C1 is one of the best Lightroom alternatives at the moment.
Luminar 4 is another alternative to Capture One and Lightroom.
However, its image management is not that great but it has some awesome editing abilities that stand out more than C1 and LR, and costs less than $100. You can see my Luminar review for more information.
What are your thoughts on Capture One?
Capture One Express vs Pro
Below is a list of features that are available in Capture One Pro, but not in Capture One Express.
Photograph and Import
Live View – View what the camera sees on your computer display.
Camera Control – Control, adjust, and capture images from Capture One.
Tethered Capture – Instantly transfer photographer image files from the camera to Capture One.
Capture Pilot – Instantly view and rate images from an iOS device.
Organize and Select
Synchronize Folders – Instantly update your catalog when new images are added to your reference folder.
Sessions – A dynamic way to control your photography workflow or shooting tethered.
Select Next When – Go to the next photo automatically when star rating or color tagging images.
Loupe Tool – Use the magnifying glass to instantly zoom into different parts of an image from 25% to 200%.
Focus Tool – Use this tool to check the sharpness of an image in the details tab.
Focus Mask – Quickly determine out of focus areas by applying a green mask to focused areas.
Image Adjustments
Annotations – Write or circle areas of an image the requires corrections.
Color Balance Tool – Accurately adjust the HSL of the shadows, midtones, and highlights.
Direct Color Editor – Use a color picker to accurately choose a color to adjust.
Color Editor Advanced – Narrow or broaden selected colors to adjust.
Color Editor Skin Tone – Accurately color grade skin tones with this tool.
Film Grain – Make your images look film-like or add texture to your image.
Lens Cast Correction – Allows you to create an LCC profile to correct color casting and light falloff.
Layers – Make multiple local adjustments using layers and masks.
Levels and Curves – Make adjustments to the RGB channels.
Gradient Masks – Apply local adjustments using a linear or radial gradient mask.
Luminosity Masking – Use a luminosity range to create a layer mask.
Normalize – Allows you to set a baseline exposure and white balance setting for multiple images.
Output Sharpening – Additional sharpening when exporting the image.
Overlay – Upload composition guides to help with image layouts.
Repair Layers – Use for spot removal or clone adjustments.
Spot Removal – Erase dust, marks, and spots on from your image.
Panel Support – Use the Tangent system for multitasking adjustments.
Export
CMYK Space Support – Export to CMYK profiles.
Watermark – Place your business logo on your images.
Soft Proof – Color grade images for the different displays or printing.
Web Contact Sheet – Showcase your photography by creating web galleries.
PSD Export with Assets – Export certain features as with PSD layers.
Lab Readouts – A professional calibration tool for checking image data in the LAB color space.
Plugin Support – Allows you to use third-party extensions.
Process Recipes – Batch export to multiple file types, color spaces, and resolutions.
Performance and Workspace
Templates – Save your custom sessions and catalog structures as templates.
Customizable Interface – Customize the location of tools for a faster workflow.
Multi Monitor – Support for multiple monitors.
Save ICC Profile as Default – Create custom ICC settings for different cameras.
Scripting (Mac Only) – Allows you to perform automated tasks.
Frequently Asked Questions
Is Capture One Any Good?
Not only is Capture One good, it’s great and is an industry leader in photography software. It can be applied to several different types of photography workflows.
Is Capture One Better than Lightroom?
No, Capture One is not better nor worse than Lightroom. They both have mutually inclusive features which cater to different types of photographers.
Can Capture One Replace Lightroom?
Yes, Capture One can replace Lightroom since it has features and tools that Lightroom doesn’t. It all depends on the photographer’s goal and workflow.
Is Capture One Non-Destructive?
Yes, Capture One is non-destructive. It won’t alter the original image files.
Is Capture One Better than Photoshop?
No, Capture One is not better than Photoshop. They are quite different photography software. Capture One is an image management software with a built-in, non-destructive image editor. Whereas Photoshop is an advanced raster image editor for complex projects.
Is Capture One Free?
Capture One Pro requires a subscription or a perpetual license purchase. Capture One Express, which has limited features, is free.
How Much Does Capture One Cost?
Capture One Pro costs $299, Capture One Fujifilm, Nikon, or Sony costs $199, and Capture One Express is free.

Hola Parceros,
I’m the founder of Aperlust. I enjoy web development and SEO and am into snowboarding and linguistics. In my spare time, you can find me destroying my opponents in chess across the globe.
You forgot the ability of C1 to create duplicating or correcting layers. This is a powerful clone tool.
And my though is that the demosaic result is so different in many cases that it could be the reason of the choice, I mean in both ways of course (my preference goes to C1).
Layers are mentioned.
But I didn’t mention digital image rendering and Capture One’s demosaic algorithm, so thank you.
C1 under Windows is completely unusable: the UI crashes regularly, irreparable DB corruptions, search doesn’t use database (!!!) but iterates through every single file (on a NAS, good luck, simple searches like ‘christmas’ take like 10 hours to complete). It’s actually so bad that most people can’t believe it: I’ve spent a few years working around these problems, communicating with support etc. – brought NOTHING. Every upgraded version added new features but didn’t fix any of these hard bugs. I’ve stayed so long in C1, as the core RAW conversion is the best available: it’s the same as LR with the color-pass checker plugin. But at the end of the day, I need to find and organize my photos, not only convert one single image. I’ve tried everything, trust me, but C1 is just that bad it can’t be used (under Mac, it works nicely – they just screwed the Win version, don’t know why). Now I’m in ACDsee, as of the speed and file management, also when working offline or via VPN connected. But the color rendering from C1 was better of course. RIP C1, I’ve paid a few years but won’t support such shaky code-base.