Last updated on May 24th, 2021
All images are made through careful control of light, both its quantity and duration. These two factors are governed by the aperture and shutter speed you select through the camera body.
However, things don’t always end with a balanced exposure, do they?
Amateur photographers need to be careful how these settings affect the image’s ‘look.’ You might want a fast shutter speed so that the action is frozen or need a small aperture for increased sharpness.
This is where ISO comes in, a wonderful result of modern technology.
When you do not have enough room to adjust aperture and shutter speed, you can use the ISO to achieve the desired image exposure.
Instead of being a physical adjustment, ISO is simply an internal characteristic of the camera image sensor. It works by adjusting the final brightness of the image ‘electronically’ rather than by adjusting the light.
Today, we’ll discuss this pillar of exposure and how it affects your photo.
What is ISO in Photography
ISO is technically an acronym for ‘International Organization for Standardization,’ but it means ‘light sensitivity’ in photography.
In a nutshell, the ISO number represents how sensitive the image sensor will be to light; it shows whether the image will be brighter or darker without changing the shutter speed or aperture.
Decades before, when ‘film cameras’ were the trend, different types of film rolls came with different ‘ISO numbers’ fixed by the Standardization Organization.
This meant that a few types of film with high ISO could produce a brighter image without requiring a longer shutter speed or a larger aperture. In fact, the same concept applies to modern cameras, too, although an electronic sensor has replaced film.
Image sensors in modern cameras work by capturing light and turning it into electrical signals. ISO is simply a number that shows how much ‘electronic amplification’ will be applied while capturing the image.
With a higher ISO number, the sensor will become sensitive to the light being captured, increase the amplification electronically, and ultimately give you a brighter image. This will allow you to change the image’s exposure without changing the shutter speed or aperture.
Think of ISO as the volume button on your speakers. When you turn the dial all the way up, the volume increases accordingly, and the music becomes louder.
But too high a volume doesn’t always sound too good. It introduces the crackling sound of gain and a horrible static in the background. The same goes for ISO. Too high an ISO number will cause your image to be grainy and lose out on a lot of detail and color.
We’ll talk about the impact of ISO on your image once we learn how ISO is measured in a camera.
Measuring ISO in a Camera
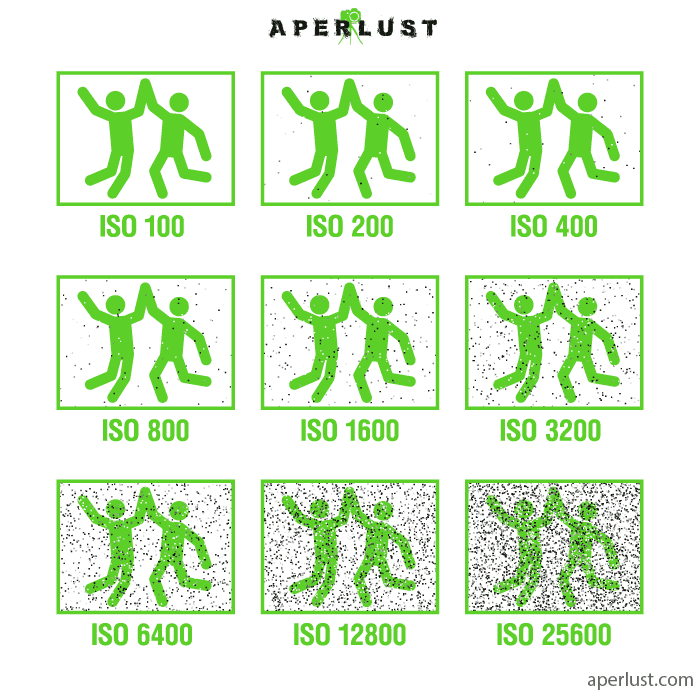
ISO values are simply numbers in your camera, usually in multiples of hundred.
If you look carefully in your camera viewfinder or the back LCD, you should see numbers like 100, 200, 400, 800, 1600, 3200, and so on. These are ISO numbers and can be selected through the appropriate buttons and dials. However, the ‘Auto ISO’ option on mid-range cameras works well enough to give you the best balance between sensitivity and image quality.
In most cameras, 100 is the ‘base ISO,’ which is nothing but the lowest possible sensitivity at which the image sensor will naturally work. Unless necessary, it is best to use the base ISO as it allows the sensor to work at the highest efficiency and avoid noise, grain, and loss of details.
ISO comes in handy when you want to adjust the shutter speed or aperture without changing the exposure, or change the exposure without adjusting shutter speed or aperture.
For example, imagine you are shooting a portrait late at night and forgot your tripod. Making the shutter speed slower might help you get the proper exposure, but it will introduce camera shake too.
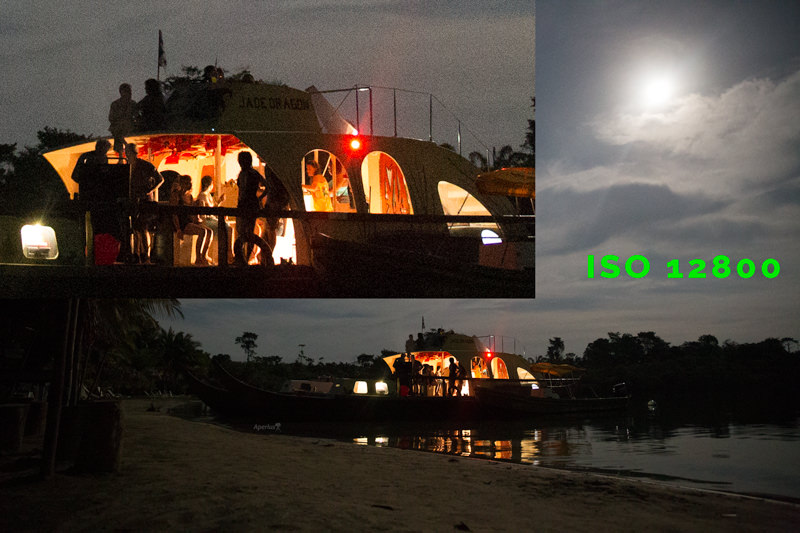
By increasing the ISO and forcing the sensor to produce a brighter image, you can eliminate the need to use a slow shutter speed and run the risk of a blurry portrait. With the strides made in camera technology and image processing software, you can easily select ISO 800 or 1600 for night shots. Use the same logic for action photography, where you need a high ISO so that your shutter speeds don’t slow down.
In daylight, there is no need to increase sensitivity, and an ISO of 100 or 200 will be more than enough.
For astrophotography — where the shutter speed is for several seconds with a large aperture — you will want to use a high ISO to intake as much light while also making sure that the shutter speed remains as slow as possible.
Most unedited photos of the stars and milky way contain noticeable luminance and color noise. Photographers use image-editing software, like Denoise AI, Capture One, or Photoshop, to reduce the noise in the final photo.
Impact of ISO on Exposure
As discussed earlier, ISO affects exposure even though it is not a physical aspect of exposure, merely a simple electronic adjustment of the sensor.
ISO affects the image in two ways — changing the brightness level and introducing noise in the photo. We’ll talk about the former in this section.
First of all, ISO is taken as the third aspect of the ‘exposure triangle’ because it changes the image’s brightness. However, just so that we’re clear, it is not an exposure setting in its strictest sense. It is an electronic adjustment done by the camera. By increasing the ISO, you will be increasing the apparent brightness in your photo without physically letting in more light.
An increase of ISO from 100 to 200 implies that you are effectively doubling the brightness. A change from 3200 to 6400 has the same effect, but with much more negative effects of noise.
In other words, by keeping the aperture constant and increasing ISO from one level to the next, you can shoot at shutter speeds twice as fast. With a higher ISO, the camera sensor does not need to depend on shutter speed and aperture to create a bright image.
Impact of ISO on Image quality
While aperture affects focus and shutter speed affects motion, ISO has an entirely different effect on the image.
Any increase in ISO introduces image artifacts or defects, known as ‘noise.’ Similar to how raising the volume causes the sound to break, raising the ISO causes an image to look grainy and lose out on fine details in dark areas, especially details like hair and skin.
The most drastic impact of high ISOs can be seen in areas that are dark but also have some color. Zooming in will show large amounts of color grain, where even deep blacks start showing dark blue and red spots, and the edges of your subject start looking blurry.
In short, a higher ISO turns a clean and colorful image into a photo with a grainy appearance and blotched colors. Although nowadays, cameras have become sufficiently advanced to handle ISOs up to 800 and 1600, you should always try to keep the ISO as low as possible.
In landscape photography, it is easy to maintain a low ISO like 100 or 200 because you can always use a tripod and slow down the shutter speed. On the other hand, shooting sporting events, concerts, and weddings might require high ISOs because not everything will be well-lit, and there is no room to lug around a tripod.
Conclusion
While photography is all about balancing light, there may be conditions where you cannot change your aperture or shutter speed to get the look you want. ISO plays a vital role in these situations.
While it may not change the amount or duration of light hitting the sensor, a higher ISO value will increase your image’s brightness through the sensor itself. This allows you to shoot at faster shutter speeds and with smaller apertures, although there is a significant cost.
High ISO values like 1600 and 3200 bring with them more noise and image artifacts, especially in the shadows. While editing and noise reduction in programs like Topaz Denoise AI can counter this to an extent, it is always advisable to shoot at the lowest possible ISO for the best possible image quality and colors.
Always try to balance things out to achieve the exposure and look you want for your image and not be afraid of experimenting with different settings. If done right, even grainy photos have a unique vintage appearance that can add to their appeal.
All you have to do is practice.
