Last updated on December 8th, 2023
Capture One vs Lightroom is an important comparison because many photographers need to know which software to use for their image management and editing workflow.
Is Capture One better than Lightroom? There’s no one answer for that and it depends on what you’re looking for.
I’ll discuss some important differences between Capture One and Lightroom.
As mentioned above, both software are digital asset managers and can also edit photos. For this reason, new photographers should consider both Capture One and Lightroom for their photography workflow as they are industry leaders.
However, you don’t need to use both of them; one of them is fine and more than effective. There’s no need to waste money on both.
There’s also occasions of experienced photographers moving from Capture One to Lightroom or vice versa for one reason or another depending on the features, which I’ll discuss shortly.
Furthermore, I’ll be comparing Capture One Pro 20 and Lightroom Classic in this blog post.
This comparison is a long read, so you can skip to the recap if you would like.
Capture One vs Lightroom
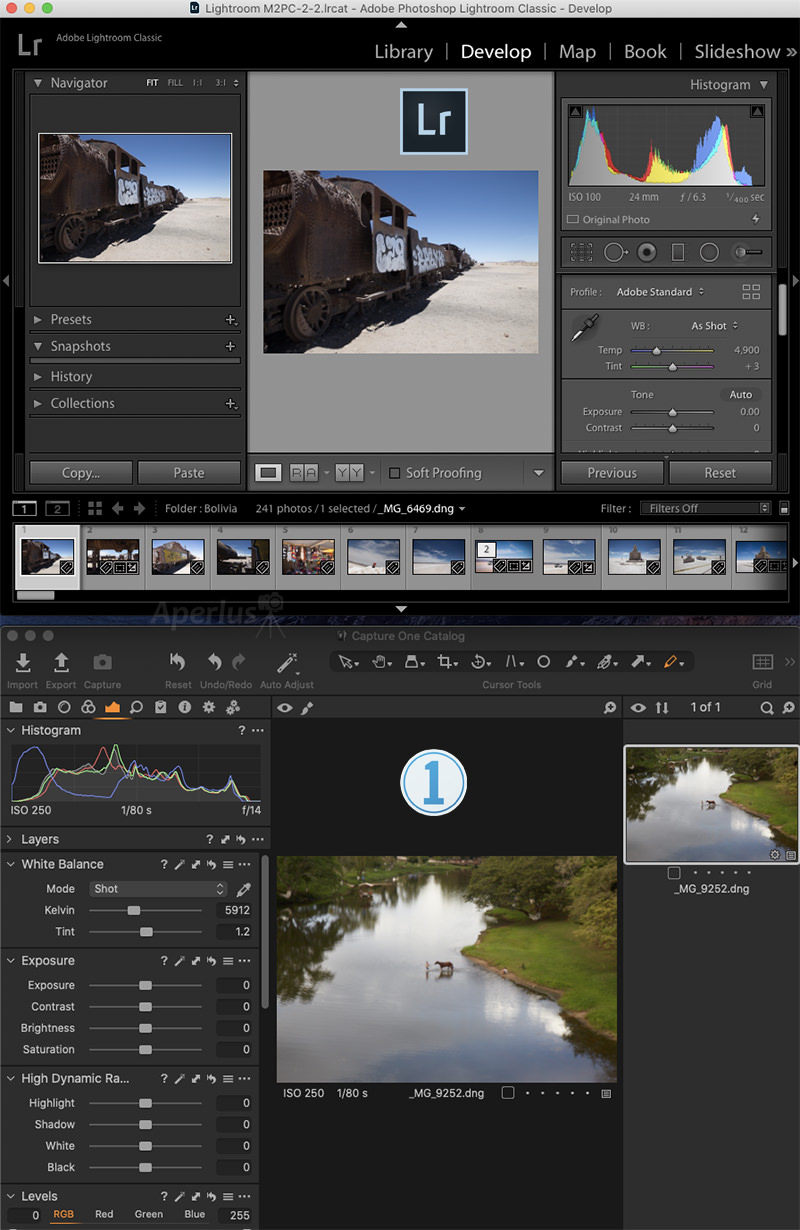
Interface
The main or selected image is in the center in both software.
Lightroom has its library information on the left, filmstrip on the bottom, and adjustment settings on the right.
By default, Capture One has its library and adjustments settings on the left, and filmstrip on the right.
Capture One’s interface is customizable, whereas Lightroom’s is not.
Lightroom’s interface is more user-friendly and simpler.
But both interfaces will take some time getting use to.
File Handling
Both software support DNG, JPEG, PNG, PSD, RAW, and TIFF.
The PSD and TIFF files are read-only. You can’t edit their layers, but you can add adjustments to the composite image and export them.
As of February 2020, Lightroom Classic 9.2 supports PSB (Large Document Format) files up to 65,000 pixels in the long edge and 512 MB. Like the PSD, it’s read-only.
There are several camera models that generate different types of RAW files. The more popular camera brand (Canon, Fuji, Nikon, Olympus, Sony,) file types will be supported by both Capture One and Lightroom.
Of course, Phase One cameras are supported by Capture One because that’s their flagship software. Lightroom also supports Phase One cameras.
Capture One Supported RAW Files
Lightroom Supported RAW Files
There are limited things you can do with some video file types in Capture One and Lightroom, so I won’t be discussing video.
Importing and Managing Images
Capture One and Lightroom both use catalogs to manage images during the import process.
A catalog is a database or library of your digital files. It helps organize your photos to speed up the photography workflow.
The catalog points to the location of your image files which is called a referenced workflow.
Capture One and Lightroom’s import processes have a few similarities:
- Choose the location of the source files (e.g., SD card, external hard drive).
- Rename files (optional).
- Enter metadata (optional).
- Choose the destination to import (e.g., keep files in same location or move to different folder).
The catalog keeps a track of the location of the imported files.
Lightroom allows users to convert RAW files into DNG files during the import step, whereas Capture One doesn’t. DNG files help save a consireable amount of disk or cloud storage: 10% to 12% in my estimate.
Continuing with the import process, a noticeable difference is Capture One allows users to import files directly into the catalog, whereas you can’t in Lightroom. This is called a managed workflow and allows photographers to store all image files in one place (inside the catalog) instead of in a separate folder.
I personally don’t use a managed workflow.
A downside of having your image files stored in the Capture One catalog is you won’t be able to view, copy, or move around your image files from outside the catalog. And within the catalog, the Mac’s Show in Finder and Windows’ Show in Explorer are greyed out.
The ability to view individual image files is important to me because I may need to use them in another software. Of course, I can export the image file then use it elsewhere but that’s counterproductive. A managed workflow is not for me and Lightroom users wouldn’t even notice the difference.
Whenever you import photos into a catalog using the referenced-workflow, it’s a good idea to organize the images into practical folders.
For example, if you’re a commercial photographer, it’s recommended to organize the folders by client, then further nest the folders by location or date. This hierarchy structure can be done in both Capture One and Lightroom.
In addition to folder hierarchies, both software have collections. Also called albums in Capture One.
Collections are used to group similar photos depending on user preference.
Furthermore, there are also smart collections. Photos are automatically added to smart collections depending on specific criteria such as images taken with a specific aperture or lens.
And here’s the big advantage Capture One has over Lightroom: sessions.
A Capture One session is a dynamic, project-oriented database or as the name implies, a session. It’s a complete project.
Sessions were originally created for file management for shooting tethered. However, tethered shooting is not required to use sessions.
Sessions are great for short-term projects that require immediate or on-the-spot final images.
By default, a session consists of a nested folder:
- Capture – Initial images go in this folder.
- Selects – Images that want to be kept or worked on are moved into this folder.
- Output – Images that are ready for exporting go into this folder.
- Trash – Images that can be deleted go into this folder.
What makes sessions a preference among photographers is its dynamic workflow.
You can move the image files between the folders in the Mac Finder or Windows Explorer and the Capture One session database will automatically update the session folder in the database.
You can also move the images between the folders by using Capture One.
In addition, users don’t need to use the Capture One import tool to import images into a session. You can do this with drag-and-drop through the Mac Finder or Windows Explorer.
The advantage of moving image files between folders makes a faster workflow from image capture to export. You can see how advantageous this would be for tethered shooting.
With sessions, you can also create your own folders. There is no need to only use the default of capture, selects, output, and trash.
Generally, you would create a new Capture One session for every new client job or project.
You can also cycle between sessions and catalogs. Use sessions for projects and a catalog for a large number of photos that don’t require immediate attention (usually your own personal photos).
Needless to say, Lightroom doesn’t have session capabilities.
The creation of one or multiple, sessions or catalogs is up to the photographer.
You can have one large catalog for all image files or have multiple catalogs for different projects in Capture One or Lightroom. Same goes for sessions in Capture One.
Further Organization of Images
Capture One and Lightroom allow users further organization by tagging photos with: keywords, a rating out of 5, and color tags.
Additionally, Lightroom has an accept or reject flag that can be assigned to every image.

These tags can be used by photographers to determine which photos can be kept or discarded, which photos have priority, etc.
With the way Capture One Sessions work, tagging may not be necessary.
Capture One vs Lightroom Image Editing
Probably the most important differences between Capture One and Lightroom are their editing tools and resulting workflows they provide photographers.
There are many features, tools, and adjustments sliders that can be discussed, but I’m not going to point out all of them. There is no reason in me discussing both their exposure or contrast sliders. I’ll try to reduce redundancy.
Color Grading
Capture One and Lightroom both come with the usual HSL (hue, saturation, luminance) and split tone tools to color grade an image.
Furthermore, Capture One comes with additional tools for advanced color grading or editing.
Capture One’s advanced color editor and color wheel allow photographers to accurately target colors.
The color editor also has a dedicated section to color grade skin tone. Combine this tool with sessions for an optimized workflow when shooting tethered portraits.
Capture One also comes with a color balance tool. It allows you to adjust the colors of shadows, midtones, and highlights independently.

Dehaze
Air pollution such as smog or moisture in the air such as fog can make an image look hazy or soft. Detail and saturation in the image are usually reduced due to haze.
Lightroom comes with a dehaze tool to combat haze. It works fantastic with the use of one slider. Capture One users are still waiting for Phase One to implement a dehaze tool.
I think the dehaze tool is important to have but not a deal breaker. Also, using the dehaze tool on images that don’t have haze adds a bit of pop to it.
HDR
High-dynamic-range or HDR photography can be used to merge bracketed photos to create a single HDR image in Lightroom.
However, Lightroom’s HDR merge tool is not that effective and doesn’t come with many options to further edit an HDR file.
In addition, Capture One doesn’t have HDR merging. It does have an HDR tool to assist with highlight and shadow recovery.
However, you can process actual HDR in Capture or Lightroom by using the Photomatix plugin or Aurora HDR software.
Read the Photomatix summary or Aurora HDR review for more information.
To sum it up, neither Lightroom nor Capture One are great at HDR merging on their own, but there are supporting software to help with this.
Lens Correction and RAW Rendering
These features are hard to eyeball without a large sample size.
But using my Canon CR2 files, it appears Capture One is better at rendering the Canon RAW files with less spherical distortion and less vignette than Lightroom.
On the other hand, Lightroom vastly supports more lens profiles than Capture One.
Lightroom’s lens correction is also better than Capture One from what I observed.
As I mentioned, it’s a small sample size and is subjective.
From listening to other photographer’s comments about Capture One, it’s better than Lightroom at rendering Fuji (RAF) and Sony’s (ARW) RAW files. That’s probably why Capture One has a special price Fuji and Sony photographers.
Masking
Capture One and Lightroom both have masking brushes.
There’s the regular masking brush plus the liner and radial gradient brushes.
These masking brushes are equivalent between the software and will help photographers make selective or local adjustments to images.
Panorama Stitching
Photographing ultra-wide landscape can be difficult at times, especially when you don’t have a wide-angle lens on hand.
Many novice photographers end up using the panorama feature on their Android or iPhone’s camera. This by all means is fine.
However, if you want to do advanced editing with a high-quality image file, then it’s better to take multiple shots of the landscape and stich them together in post.
Luckily, Lightroom has a panorama stitching tool. Capture One unfortunately, doesn’t.
I don’t do much panorama stitching. And even if I did, I prefer to do it in Photoshop, so I can improve upon the stitching.
Panorama stitching is a nice-to-have.
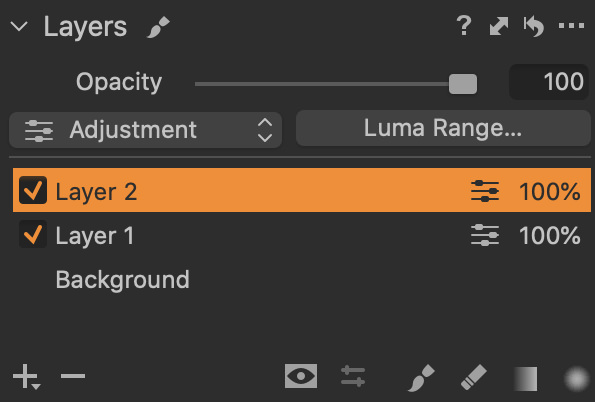
Layers
A disparity between Capture One vs Lightroom is layers.
Layers are edited blocks which allows stacking of adjustments on top of the source image. Each layer can have 0 to numerous adjustments.
Imagine you have an image and you want to test out how different types of adjustments make the image appear.
In order to do this, a good workflow would be to use layers.
Let start by referring to the image as the background or source layer. Then we can manually add a layer, which we’ll simply call layer 1. Now we can adjust layer 1 such as increase the exposure which will increase the exposure of the overall image.
Now suppose we want to add contrast to the image. We can do this by creating layer 2 and adding contrast to it.
Now the image has both increased exposure and contrast. If we want to see the image without the exposure adjustments, then we can easily hide layer 1 and only layer 2 adjustments will be visible on the image.
This is a simple example of how layers can be utilized and usually isn’t used this way. They are more often used for more complex adjustments.
Capture One has the ability to create up to 16 layers. On the other hand, Lightroom does not support layers and will require the use of Photoshop.
Annotations
A cool team feature Capture One has is annotations, which is metadata.
This tool allows users to write or circle on the image what needs to be edited.
And the annotation and image file can be shared with other Capture One users as an EIP file for improved collaboration with other photographers.
The annotation and image file can also be saved as a PSD file with layers.
The Capture One annotations can be marked or written using a mouse or stylus pen. I would like to see in the future to able to use the keyboard and write text.
Lightroom does not support annotations.
Retouching
Both Lightroom and Capture One can be used to retouch or clean up an image.
They have heal and clone brushes to do a decent clean-up job.
Capture One’s clone and healing brush tool requires you to create a clone or heal layer for improved retouching.
Soft Proofing
Soft proofing is the photography process of preparing an image file for print.
The image file, usually JPEG, needs to be color graded for a specific printer color profile.
The printer color profile can be adjusted by selecting or uploading a new ICC (International Color Consortium) profile. Many print companies have their own ICC profile for photographers to use.
Fortunately, Capture One and Lightroom provide efficient color-managed workflows, which allow users to easily change the ICC profile and adjust the images accordingly.
Exporting Images
Capture One and Lightroom can both export DNG, JPEG, PNG, PSD, and TIFF files.
They can both also export images individually or in batches.
However, Lightroom can only export one file type and size at a time: it can export JPEGs or TIFFs but not both at the same time and only at one resolution.
Capture One has the advantage that it can export multiple file types at different resolutions. These are called process recipes in Capture One.
Process recipes save photographers time in their workflow. They allow photographers to export multiple file types at different resolution. This is ideal when sending a client one file type and resolution and sending a print company a different file type and resolution.
Extra Features in Lightroom That Are Not in Capture One
Lightroom has extra sections and features that are not included in Capture One. Sections in Lightroom are referred to as modules such as the library or develop module.
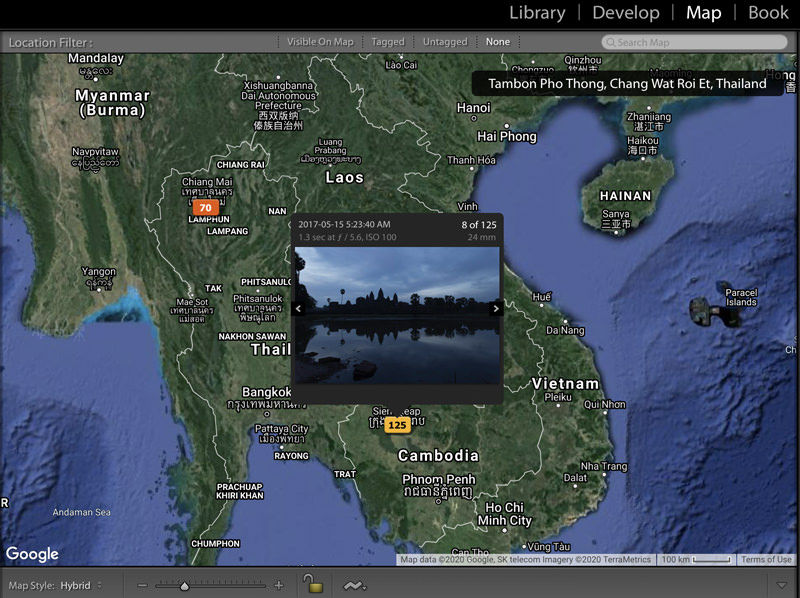
Map Module
If you’re camera has geotagging, then you’ll be able to view the GPS location of your images in Lightroom’s map module.
It’s a cool feature when you want to remember the locations of your photographs plotted on a map.
The map module is especially useful for travel photographers that capture images in remote locations that don’t have names.
Publishing Services
Lightroom allows photographers to upload images directly online.
With this feature, you’ll be able to upload images directly into Facebook, Flickr, Adobe Stock, etc.
I have used this feature a total of 0 times in the 7+ years I’ve been using Lightroom.
Book and Print Modules
The book and print modules are two separate modules which are amazing.
The book module allows photographers to prepare a photo album by helping with the layout. It also allows you to upload your album directly to a printing company like Blurb.
The print module helps with page setup of prints by providing guides for page bleed, margins, etc.
With soft proofing, the book and print modules are exceptional tools to prepare hard copies.
The Real Important Question – How Much Do They Cost?
Lightroom Price
Maybe the biggest complaint photographers have with Lightroom, and Adobe in general, is its subscription method in order to use Adobe apps.
Originally, Lightroom versions 1 to 6 were available for purchase. Customers were provided a perpetual license for usually less than $200.
Now, Lightroom is part of the Adobe Creative Cloud which requires a subscription.
The lowest price you can get Lightroom Classic for is $9.99 per month with the Adobe Photography Plan. However, the plan also includes access to Photoshop, the non-professional version of Lightroom, and 20 GB of cloud storage.
The Photoshop extra is a big bonus since it’s the best advanced image editor and pretty good for graphic design.
The 20 GB of cloud storage isn’t enough and I use Dropbox for that service. And it’s unlikely you’ll be using the other, lower-end version of Lightroom, which is usually called Lightroom CC.
The advantage of the subscription plan is that it includes all updates and major upgrades.
Student pricing is available with Adobe. But it doesn’t provide a discount on the photography plan. It’s only beneficial if you subscribe to the All Apps plan which provides access to all apps and costs $34.99/month instead of $52.99/month.
Capture One Price
The biggest, non-technical advantage Capture One has over Lightroom is its price.
Many people, and justifiably so, are against subscription plans or recurring fees.
A perpetual license of Capture One Pro can be purchased for $299 and supports over 500 camera models
Capture One Fujifilm or Sony costs $129 for a perpetual license.
The perpetual license includes all software updates. A major version upgrade will require an upgrade fee. But you’re not forced to upgrade and you can still keep using your current version.
The latest version is Capture One 20. It doesn’t have many new features or tools over the previous major version of Capture One 12. Therefore, it’s not worth upgrading from Capture One 12 to 20, which saves users money.
Capture One also offers student discounts of 65% off. But the discount only applies to the subscription plan of Capture One Pro which normally costs $20/month or $180/annually.
Recap of Capture One vs Lightroom
Capture One has a customizable interface. The default interface is a bit clunky but it’s easy to adjust and move around the tools to a photographer’s preferred workflow. Lightroom’s interface is not customizable.
Capture One provides two ways to manage photos: catalogs and sessions; whereas Lightroom is only catalog-based. I don’t shoot tethered but from research, many photographers prefer sessions and tethered sessions in Capture One.
Lightroom has a better RAW image import process since it can convert RAW files into Adobe’s lossless DNG RAW format. DNG files save a considerable amount of space when working with thousands of photos. For some reason, Capture One only converts RAW files to DNG during export. Capture One can also render DNG images.
Capture One has layers – one of the best ways to edit images is with stacked adjustments. Therefore, you won’t need Photoshop unless you’re doing advanced editing. Lightroom doesn’t have layers.
Lightroom has panorama image stitching and HDR merging whereas Capture One doesn’t. These features aren’t deal breakers but I can see where landscape photographers may want these features.
I personally don’t do much panorama stitching and my HDR photography is done in Photomatix or Aurora HDR. Photomatix provides a plugin for Capture One and Lightroom, on the other hand Aurora HDR’s plugin is only available for Lightroom.
Capture One has better color grading with its advanced color editor. But you can still color grade well in Lightroom.
Lightroom has book and print modules. Most photographers don’t use all the modules, but for client jobs, the book and print modules make it easier for soft proofing print-ready images. You can still soft proof images in Capture One by changing the ICC profile and so on.
Lightroom is intuitive for beginners. It’s easy to import, edit, and export images from the start. Capture One has a learning curve that will require you to read or watch a few tutorials.
Capture One has better RAW image rendering for Fuji and Sony cameras as mentioned by other photographers. The images just look sharper and crisper on Capture One.
Lightroom’s retouching is better with its spot removal brush. The Capture One spot removal tool is limited and is only good for dusts spots or small distractions.
Conclusion
The above Lightroom vs Capture One comparison should give you a better idea on which software is right for you.
My personal view is Lightroom is more user friendly than Capture One. This isn’t to say you should choose Lightroom over Capture One if you’re a beginner. I’m just pointing it out.
Another alternative to Capture One and Lightroom is Luminar 4. The software’s image management is not as great as C1 or LR but it does have really good editing abilities and is cheaper. For more information, read my Luminar review.
Finally, one aspect that is overlooked is Lightroom comes with free access to Lightroom Mobile: a powerful mobile image editor for Android and iOS. And you can sync your Lightroom Mobile photos to your desktop version of Lightroom.
For more information on Capture One, read my Capture One Review.

Hola Parceros,
I’m the founder of Aperlust. I enjoy web development and SEO and am into snowboarding and linguistics. In my spare time, you can find me destroying my opponents in chess across the globe.