Last updated on April 13th, 2023
Having an abundant collection of photos is a good thing. It means you have several memories worth cherishing. Moreover, your photography hobby or business is thriving.
As a result, you must know the best way to organize photos. If you don’t, your images will be cluttered throughout your computer, making it hard to locate or edit later.
That’s why I’ll explain how to organize your pictures best using my digital photo filing system.
I should start by mentioning that I’m a travel photographer and primarily focus on landscape photography. This means the way I organize my photos is best for my situation and travel photography. The method I’m filing pictures may work for you, but I’ll also mention other ways to take advantage of image filing techniques.
Furthermore, I’ll cover essential topics like digitizing prints, image management software, and face recognition for photos.
Let’s start.
How to Organize Photos
The best way to organize photos is by using photography software.
They’re commonly called digital asset management software.
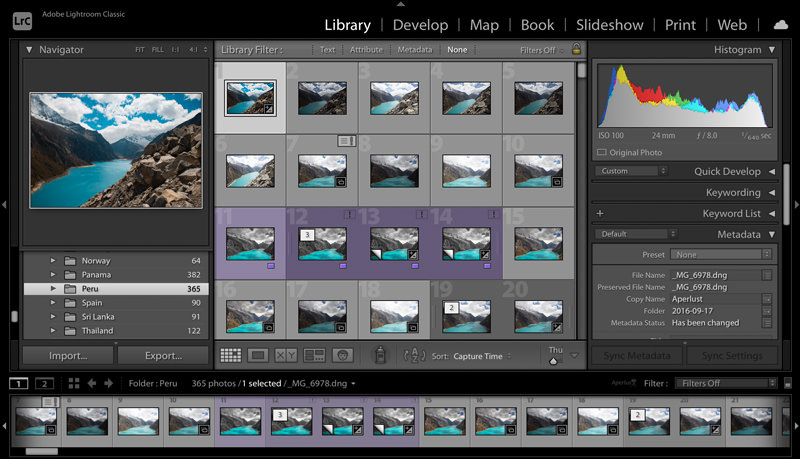
I use Adobe Lightroom Classic. Capture One Pro is another efficient photography software. The advantage of these two software is that they can both also edit images.
In contrast, the prehistoric photo filing technique is manually sorting your photos in Windows Explorer or Mac Finder. Though this does work, it is incredibly time-consuming. Consequently, it will be harder or more troublesome to locate, view, and edit your digital pictures.
I’ll explain how filing pictures work with and without an image management software.
Photo Filing with and without Software
As mentioned earlier, I’m a travel photographer.
I organize my images by country → year → date.
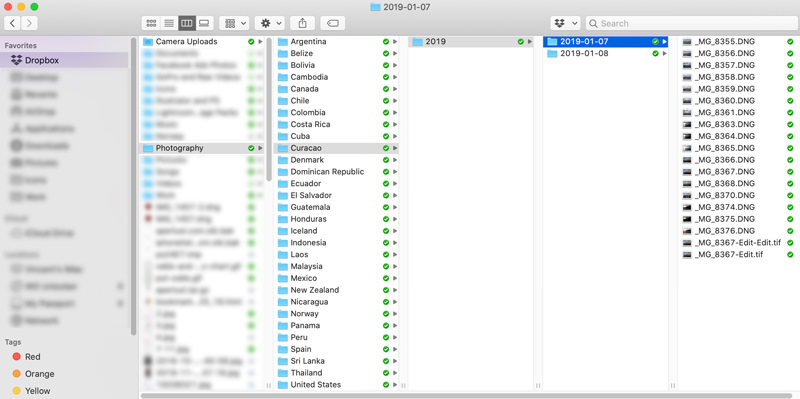
I file pictures this way because, later, when I want to view or edit my images, I’ll immediately know which country the photo is located. And I’ll usually have a good idea of the year (but most times there is only one folder for year). I then search the photos through viewing them. This is made easy with a digital asset manager with a dynamic grid that displays multiple images simultaneously.
One thing you’ll notice is I don’t rename my files. The somewhat arbitrary file names produced by the camera doesn’t bother me. But the autogenerated sequential numbers in the filename are useful when I do an advanced search and edit my images. Most digital asset managers provide the option of renaming the image files during import.
If you’re not planning to use photography software, I recommend changing the file name to something appropriate. Luckily, both Windows 10 and macOS have options to batch rename files, saving you time.
For family photo albums, I suggest organizing the pictures by year → month.
If you’re a professional photographer, then organizing by event/date makes sense. Of course, if you’re a professional, you’ll be using photography software.
Further Organize Photos with Tags
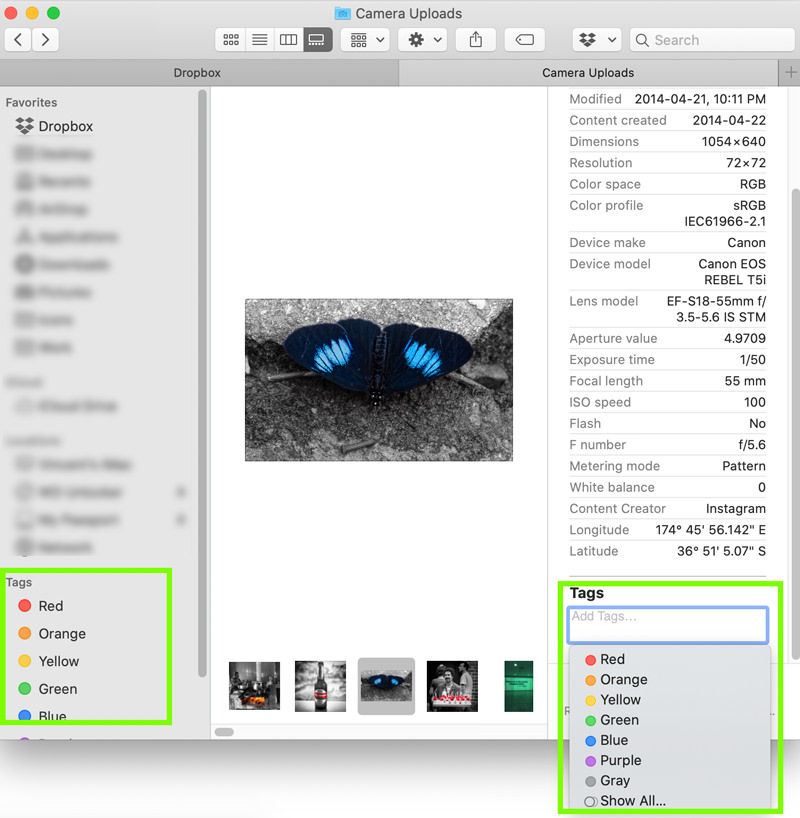
Windows 10 and macOS allows users to add metadata or keywords to files. The metadata is used to search or sort files. Most people don’t take advantage of this, but you can apply it to image files in addition to documents.
For example, on macOS, you can add color tags and keyword metadata to your images. You can apply this data to your photos to improve the organization.
If you have children, you can apply one specific color for each child. On the other hand, you can create a separate folder for every family member.
Photographers use color tags and metadata more often because they have thousands of photos that need sorting. Lightroom and Capture One can efficiently complete this task.
Many photographers prefer using Capture One over Lightroom because its image library or catalog is better at tethered shooting with sessions. It’s handy when you want quickly want to sort your aesthetic photos from the rejects during a portrait session. You can read my Capture One review for more information.
Where to Store Your Photos
Before readily available external hard drives and cloud storage, most people would only save their photos on their computer’s internal hard drive.
With the value of photos — sentimental or monetary — having at least one backup of your pictures is critical. Hard drives crash, external hard drives drop, and cloud storage can become corrupt.
Backup to an External Device or the Cloud
The method I use to back up my images is to save it on my Mac’s hard drive. But I take an additional step; Dropbox is integrated with the hard drive folder where my saved images and important files.
Each time Dropbox runs, my documents and media are saved to the Dropbox cloud storage.
I usually have two copies of the files I can’t afford to lose: hard drive and cloud storage.
The downside of using cloud storage is its recurring fee. That’s why many photographers prefer having one or two external hard drives as backups.
Some photographers exclusively save their photos on external hard drives, since internal hard drive space on laptops, especially solid-state drives, is expensive.
Mobile Photos
I do not organize my smartphone images. But I do back them up and keep them readily available on my computer.
I do this by using the Dropbox app and apply the sync setting to my images.
It’s also possible to sync and organize the images in Lightroom. Still, I don’t bother with this, mainly because several of the images are general and serve no purpose to my travel photography. Besides, they are often in JPEG, and I don’t add JPEGs to my Lightroom library — only RAW.
If I need to locate my mobile photos, I’ll sort them by date in my Mac Finder via the Dropbox folder. It works for me.
I understand some people justify shooting RAW + JPEG. But that takes up a considerable amount of storage. I tried it before and would only end up editing or working with the RAW image. It’s a tempting feature.
Adobe Bridge for Photo Filing
Adobe Bridge is somewhat of a redundant software for photographers because we already utilize a digital asset manager.
However, Adobe Bridge is free to use. You only need a free Adobe Create Cloud account and you don’t need to deal with the price of Lightroom.
What is Adobe Bridge? Think of it as Windows Explorer or Mac Finder on steroids.
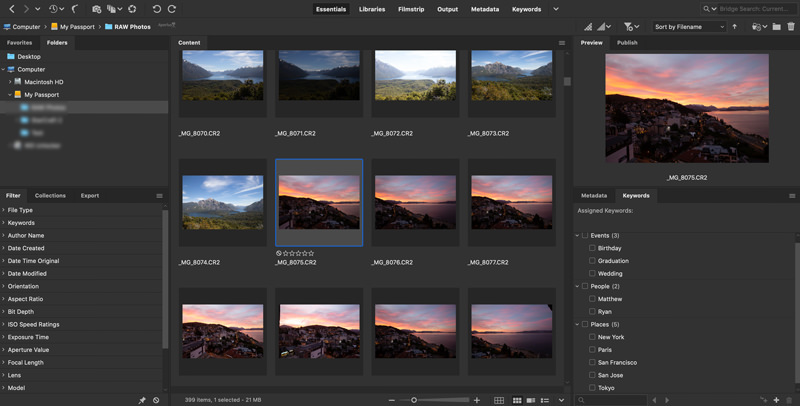
At times it can come in handy when you have different media types like images, video, audio, and vectors to go through.
I’m pointing this software out because it helps with organizing mass amounts of photos. And it’s visually more user-friendly than Windows Explorer or Mac Finder.
Adobe Bridge is excellent at locating, sorting, and moving image files. Renaming and tagging are simple too.
In addition, you can take your photo filing over the top.
Face Recognition for Photos with Lightroom
Lightroom has a neat feature that allows you to find, identify and sort nearly all the people in your image library.
It stacks photos of the same person together, and then you can assign a name to them and further group the images.
I do take photos of people, but I don’t use the face feature. And some of the people I do not know by name. 🙂
Can you guess where the face recognition comes in handy? In wedding and event photography, when there will be several different people in the day’s event. You can find all the bride and groom’s images in about 5 seconds from a batch of 1000 photos.
If you use Facebook, you’ll notice it also has a face recognition tool when tagging people in images.
Printed Photos
You may have a photo album before digital photography was available.
I’ll provide a few tips on how to digitize the prints.
Use a high-end scanner.
Photograph the prints with a DSLR or mirrorless camera. You’ll want to shoot RAW to capture all the data in case you need to improve the image with editing. You’ll probably have to crop away dead space.
Use your smartphone. This is probably the cheapest method if you don’t have a scanner or DSLR available. If you use your smartphone, make sure to change the camera settings to shoot in RAW.
After you digitize your prints and have them on an SD card or USB stick, you can apply the same photo filing system.
Pro tip: Use your camera and tripod. Place the tripod on an elevated service and parallel to the surface with the camera hanging off the ledge. Place the printed picture, on a below level, in front of the lens. Then, set up the camera to frame the print perfectly and then use the setup for all other pictures. Remote shooting will help in this situation. It’s better to use live view instead of the camera viewfinder for composition.
Conclusion
Managing your photo library is easy when you shoot periodically. Heck, you may not have to organize them and dump all the pictures in one folder.
On the other hand, if your collection of photos is in the thousands — it will most likely be with nearly everyone owning a camera phone — than knowing the best way to organize your photos is vital.
Hopefully, my photo filing method helps you out.
If you organize images differently, then let us know in the comments below.

Hola Parceros,
I’m the founder of Aperlust. I enjoy web development and SEO and am into snowboarding and linguistics. In my spare time, you can find me destroying my opponents in chess across the globe.
Hi- i’m trying to visualize how to make this work…for digitizing an older photo.
“Pro tip: Use your camera and tripod. Place the tripod on an elevated service and parallel to the surface with the camera hanging off the ledge. Place the printed picture, on a below level, in front of the lens. Then, set up the camera to frame the print perfectly and then use the setup for all other pictures. Remote shooting will help in this situation. It’s better to use live view instead of the camera viewfinder for composition.”
Could you help me with this– I’m not understanding. IS the tripod set up with the phone vertically & then you place the picture on another surface verticall?
Thanks.
Hi,
Take a look at this image and this. They use high-end tripods here, but you can use a basic tripod and a chair or ledge to replicate this setup.