Last updated on March 16th, 2021
The mechanics of a camera lens is to intake light and bend it towards the film or image sensor. Sometimes images look crooked, blurred, or worse, distorted as we capture images to our SD card. The picture may turn out to be different from what you saw in the camera’s viewfinder, which is often too small to notice. It is natural, and this is called distortion.
This is a significant factor in photography and the produced photo. Depending on the look and feel that we are trying to achieve, it can make or break our pictures.
The point to consider is that not all distortions are bad. It can also be used as a form of impact or direction for the photographer to share their photography perspective.
What is Lens Distortion in Photography?
By definition, an optical aberration induced by the composition of the lens is called lens distortion. Two common forms of lens distortion are barrel and pincushion distortion. A worse type is mustache distortion (a barrel and pincushion combination). We’ll get more into this later.
All photographers encounter lens distortion sooner or later.
There is never a perfect picture; there will almost always be a certain — but not always noticeable — amount of distortion.
When we try to capture an image, there is mostly a difference between what our eye sees, what the lens projects, and what the camera sensor records. Lens distortion is often overlooked as most of us do not care because of the hassle to correct it, but it can matter quite a lot if you are photographing commercially.
Photographic distortion can be divided into two categories: perspective distortion and optical (lens) distortion.
Any deformation that occurs in the images created by a camera lens is lens distortion. In general, lens distortion can be defined as when straight lines in photographs appear bent or curved.
Furthermore, lens distortion can also be defined as an error in the lens during the image capture. It means the lens was not able to project the image correctly.
The structure of lens glass and the bent light reaching the image sensor causes lens distortion.
How to Avoid Lens Distortion
The first thing to remember is that the image center or near the optical axis has the least amount of lens distortion. But this doesn’t always hold true, as you’ll see with fisheye lens distortion.
Adjust the Point of View
The safest way is to eliminate or reduce lens distortion in the field is by keeping the camera plane and the subject aligned, i.e., to tilt the camera as little as possible. Find a high vantage point and aim parallel to the main subject if the focus is elevated. With the same lens, you can adjust your location and shoot from a spot further away from your subject. But this method is not always ideal.
Use a Standard Lens
Using a standard lens is another choice that should ideally exhibit less distortion compared to a wide-angle or telephoto lens. Unfortunately, the composition and field of view are influenced in both directions, which might not always be practical.
Correct Lens Distortion with Photography Software
We’re luckier than many of the famous photographers in history in the sense that we can use photography software to correct or enhance an image.
Most modern picture editing software can correct distortion in at least one of two ways.
First, in the post-production program that you are using, you can see if there is a lens profile correction, or second, you can try to fix it manually.
In RAW image editors, such as Adobe Lightroom or Capture One (read the Capture One review), almost every lens has a lens profile correction available these days. In addition, specialized software such as Photomatix (read the Photomatix review) also has lens profile corrections if you are making HDR images.
These profiles automatically correct lens distortion with a single click. They can be left on by default, so you might never find an issue in your pictures. Double-check that the lens profile correction is turned on by default.
How to Correct Lens Distortion with Lightroom
- Open Lightroom Classic.
- Select your photo.
- Click on the Develop module.
- Click on the Lens Correction tab.
- Click on Enable Profiles Corrections.
- Select the lens Make, Model, and Profile.
- The lens correction will now be applied.
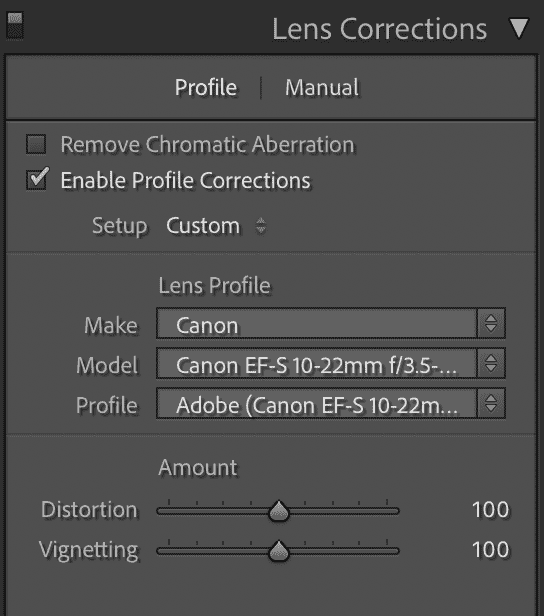
Lightroom can also automatically detect the Make, Model, and Profile of the lens by pulling the lens model from the RAW file’s EXIF data.
You can also click on Manual under Lens Corrections, and you can manually fix the lens distortion.
Remember, often, you will need to re-crop the image while making adjustments because the modifications will push the sides of the image outward or inward.
What is Barrel Distortion?
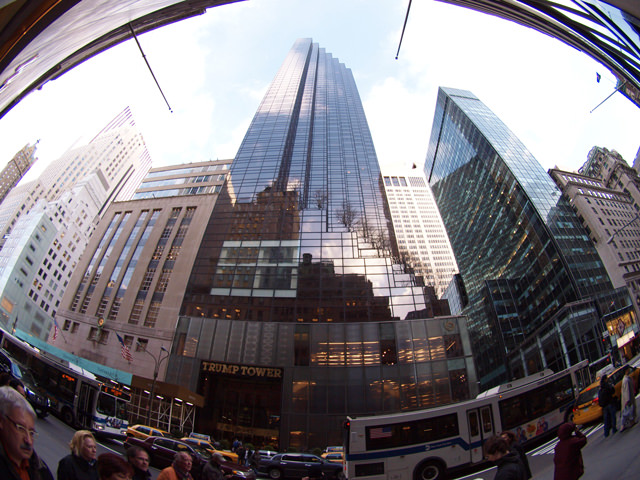
Barrel distortion is associated with wide-angle lenses and zoom wide-angle lenses at the shorter focal ranges. It is a lens defect that causes straight lines to bend outwards and is most noticeable along the edges. In extreme cases, the center of the image looks like it’s bending towards you.
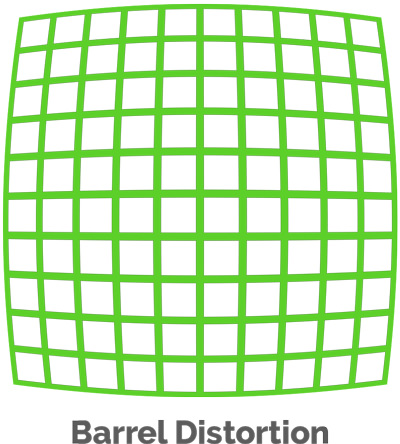
Check parallel lines in a photo and see if the lines look parallel or straight is a good way to determine barrel distortion. The curved form of the lens produces barrel distortion. Since the lens is curved, it magnifies the middle of the frame significantly more than the sides, which makes straight lines appear to curve around the picture’s edge.
As you can see in this image, lines appear straight at the center of the picture and only begin to bend away from the center. That’s because camera lenses have the least amount of distortion along the optical axis (center of the lens), and the magnification towards the corners decreases.
What Causes of Barrel Distortion?
Barrel distortion occurs when the lens bends light from a wide field-of-view. Typically this is the case with wide-angle lenses that cause edges to bend to reach the image sensor.
Wide-angle lenses generally have more spherical glass than telephoto lenses. As the name suggests, they have a large radius to photograph a wide area and bend the light into the image sensor. Typically is the case for landscape photos captured with wide-angle lenses.
The barrel distortion appearance is caused by the magnification of the image decreasing from the optical axis center to the edges.
Fisheye lenses often cause barrel distortion. Some fisheye lenses are so extreme that the shape of the image is circular rather than the conventional rectangular shape. They come in handy when photographing tight spaces such as a house’s interior for real estate photography. Many photographers also like to play around with fisheye lenses to get a funny photo, especially with animals.
How to Avoid or Fix Barrel Distortion
Try to avoid shooting buildings or other objects with straight lines at a wide focal range where the barrel distortion would be quite noticeable. Take many images of the same subject at various focal ranges and compare later. A standard focal length of 50mm is also good.
Of course, this is counterproductive when you want to take a landscape shot. Therefore, you should photograph at the optimal focal length to capture your subject and fix the barrel distortion in an image editor.
Adobe Photoshop can quickly fix barrel distortion via the Adobe Camera RAW filter. Many free apps for photo editing also provide solutions to fix barrel distortion.
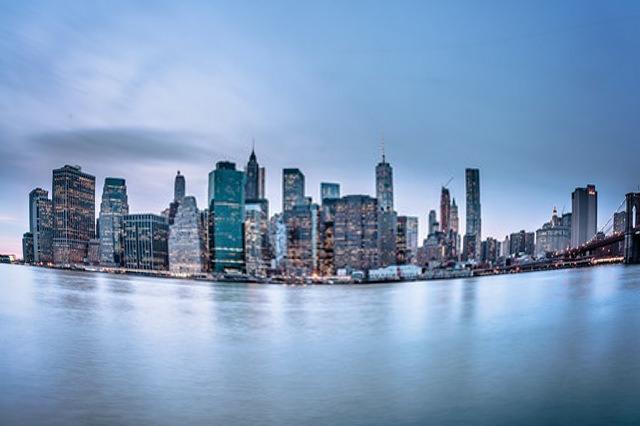
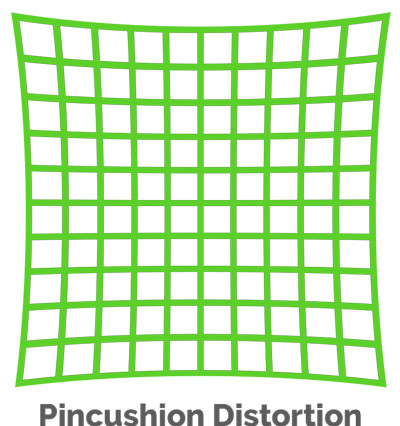
What is Pincushion Distortion?
Pincushion distortion is the opposite of barrel distortion. It causes straight lines to curve inward from the edges to the middle. Telephoto and telephoto-zoom lenses are most commonly associated with pincushion distortion.
Images with pincushion distortion will appear squished in.
What Causes Pincushion Distortion?
Typically, the distortion would happen at the telephoto end of the lens. The longer focal ranges increase image magnification from the optical center axis to the edges. As mentioned earlier, barrel distortion causes image magnification to decrease from the center.
Similar to barrel distortion, pincushion distortion is most noticeable in photos with straight lines. A cityscape with a zoomed-in telephoto lens will cause this optical aberration.

How to Avoid or Fix Pincushion Distortion
Minimize photographing at longer focal lengths with telephoto lenses. Instead, try walking close to your subject. This tip may not help if you’re on an African safari with lions.
Switch to a new position to see if a different perspective diminishes the pincushion effect.
Much like barrel distortion, you can easily correct pincushion distortion in photography software like ON1 Photo Raw (read review) or Exposure X (read review) with lens profile corrections. Many cheaper or free photography software also allows for manual lens corrections. But automatic lens profile corrections are best.
What is Mustache Distortion?
Mustache distortion is the worst and is a combination of barrel and pincushion distortion. Lines appear curved inwards near the image center and notably curved outwards at the edges. Though not as common anymore, some lenses still have mustache distortion.

In wide-angle lenses, mustache distortion is sometimes seen and makes straight lines look wavy. Hence the reason it is also called wavy distortion. It can be seen on the horizon, particularly if the horizon is near the top or bottom of the frame when photographing landscapes.
Moustache Distortion is common in some cheap, lightweight ultra-wide lenses like 14mm lenses.
How to Avoid or Fix Mustache Distortion
The best way to avoid mustache distortion is to avoid buying cheap glass — inexpensive wide-angle lenses. And research or test lenses before buying them.
Mustache distortion is complex to fix. Generally, most photo-editing software do not have lens profile corrections to fix mustache distortion.
If you try to fix mustache distortion manually using the conventional tools in Lightroom or Adobe Camera RAW, you’ll either create more barrel or pincushion distortion.
On the other hand, Photoshop is still king at image editing. If you’re advanced with layers, masking, and filters, it will be possible to fix or reduce mustache distortion. But it’s a lot of manual and time-consuming work.
What Is Perspective Distortion?
Perspective distortion is a distinct form of visual distortion and is not caused by the lens.
Suppose the subject is too close to the camera. It can look large or distorted in three-dimensional spaces projected onto a two-dimensional image compared to other objects in the background.
Perspective distortion is a natural phenomenon. For example, if you take a small object, such as a pen, and then bring it close to your eyes, it will look huge. The same happens when we are taking pictures of a particular subject. A typical touristy example is a person holding up the Leaning Tower of Pisa or the famous perspective photos from Salar de Uyuni.

There are two main kinds of perspective distortion:
Wide-angle Distortion
Wide-angle distortion is caused by objects in the foreground or near the camera appearing larger relative to the background objects.
Objects typically appear bigger as it gets closer to human eyes. In photography, this same idea applies. If you use a wide-angle lens to place your subject near the frame, whatever is nearest to the camera will appear excessively big in your final picture.
Compression Distortion
Compression distortion is caused by taking a photo of your subject from a far-out distance using a telephoto lens. This type of perspective distortion is common and makes the subject and background appear closer together than they actually are.
How to Fix Perspective Distortion
There are no lens profile corrections to fix perspective distortion because it’s not an optical error. And often, it’s not a photographic mistake and is acceptable.
Interestingly enough, Photoshop does have a Perspective Warp tool to fix common problems such as buildings looking slanted depending on your vantage point. You can find it under Edit > Perspective Warp to correct the perspective.
Use Distortion for Aesthetic Photography
You can use distortion to produce imaginative and out-of-your-league photos that catch the viewer’s eye right away. You have seen pictures of people holding the Eiffel Tower in their hands — use distortion to create magic.
A fisheye lens can offer fascinating views of popular architectural subjects, such as a scrunched view of the Paris skyline, with the Eiffel Tower in a corner and bent to give a funny picture.
Conclusion
An inevitable aspect of taking pictures is image distortion. High-end lenses can make lens distortion negligible.
You can reduce the appearance of lens distortion by recognizing and correcting it in photo editing software.
But the most essential thing with distortion, whether it be perspective or lens distortion, it’s not always a bad thing. In many cases, image distortion can make your photography look more aesthetic. Who wants to live in a straight line anyway?
